
Developing an app on Shopify may seem difficult for beginners, but anyone can get started by understanding the basic steps. This article explains the basic steps of Shopify app development step by step so that even beginners can understand. We will explain in detail the process from setting up the necessary tools, creating a basic app, using APIs, and finally publishing the app on the Shopify App Store. By reading this article, you will understand the basics of Shopify app development and have the confidence to start your own project.
Shopify Overview
Shopify is an e-commerce platform that makes it easy to create and run an online store. It is designed to meet the needs of any business, from beginners to experienced businesses.
Its key features include product management, customer management, order processing, inventory management, payment processing, shipping settings, SEO features, marketing tools, etc. Through these features, users can build a professional online store without any knowledge of code.
You can also customize it to suit your business with a wide range of apps and themes.
Shopify app roles
Shopify apps are important tools for extending the functionality of your Shopify store to meet specific business needs, such as streamlining inventory management, enhancing customer support, automating marketing, and fulfilling special design requirements.
There are three types of Shopify apps: free apps, paid apps, and custom apps built to fit your specific business requirements. Free apps offer basic functionality, while paid apps offer more advanced features and support.
Custom apps are uniquely developed to suit your specific business needs, providing a completely tailored solution.
Build a development environment for Shopify apps
To develop a Shopify app, you will need to install the following tools:
- Node.js : Node.js is a JavaScript runtime environment and is essential for developing Shopify apps. Download and install it from the official Node.js website ( https://nodejs.org/ ).
-
Ruby : To use the Shopify CLI, you need Ruby 3.x or higher. You can install it in the following ways:
- Download from the official website : Download it from https://www.ruby-lang.org/ and install it.
-
For Mac (using Homebrew) :
brew install ruby -
For Windows (using apt-get) :
sudo apt-get install ruby
-
Shopify CLI : Shopify CLI is a tool that makes it easy to develop, deploy, and manage Shopify apps. Install it with the command:
npm install -g @shopify/cliThe basic commands are:-
shopify login: Log in to Shopify. -
npm init @shopify/app@latest: Creates a new Shopify app.
-
Sign up for the Shopify Partner Dashboard
To develop and sell Shopify apps, you need to register for the Shopify Partner Program. To register, follow these steps:
- Join the Shopify Partner Program : Visit https://partners.shopify.com/ and create an account. By joining the partner program, developers can access a variety of features, including creating new apps, creating test stores, and tracking earnings.
- Create a new app : After logging in to your Partner Dashboard, you can create a new app from the "Manage Apps" section. Here you can enter the name of your app, get your API key, etc. You can also create a new app using the CLI command.
Step 1: Create a new app
You can create a new Shopify app using the Shopify CLI
- Navigate to the directory where you want to create the app. The app will be created in a new subdirectory.
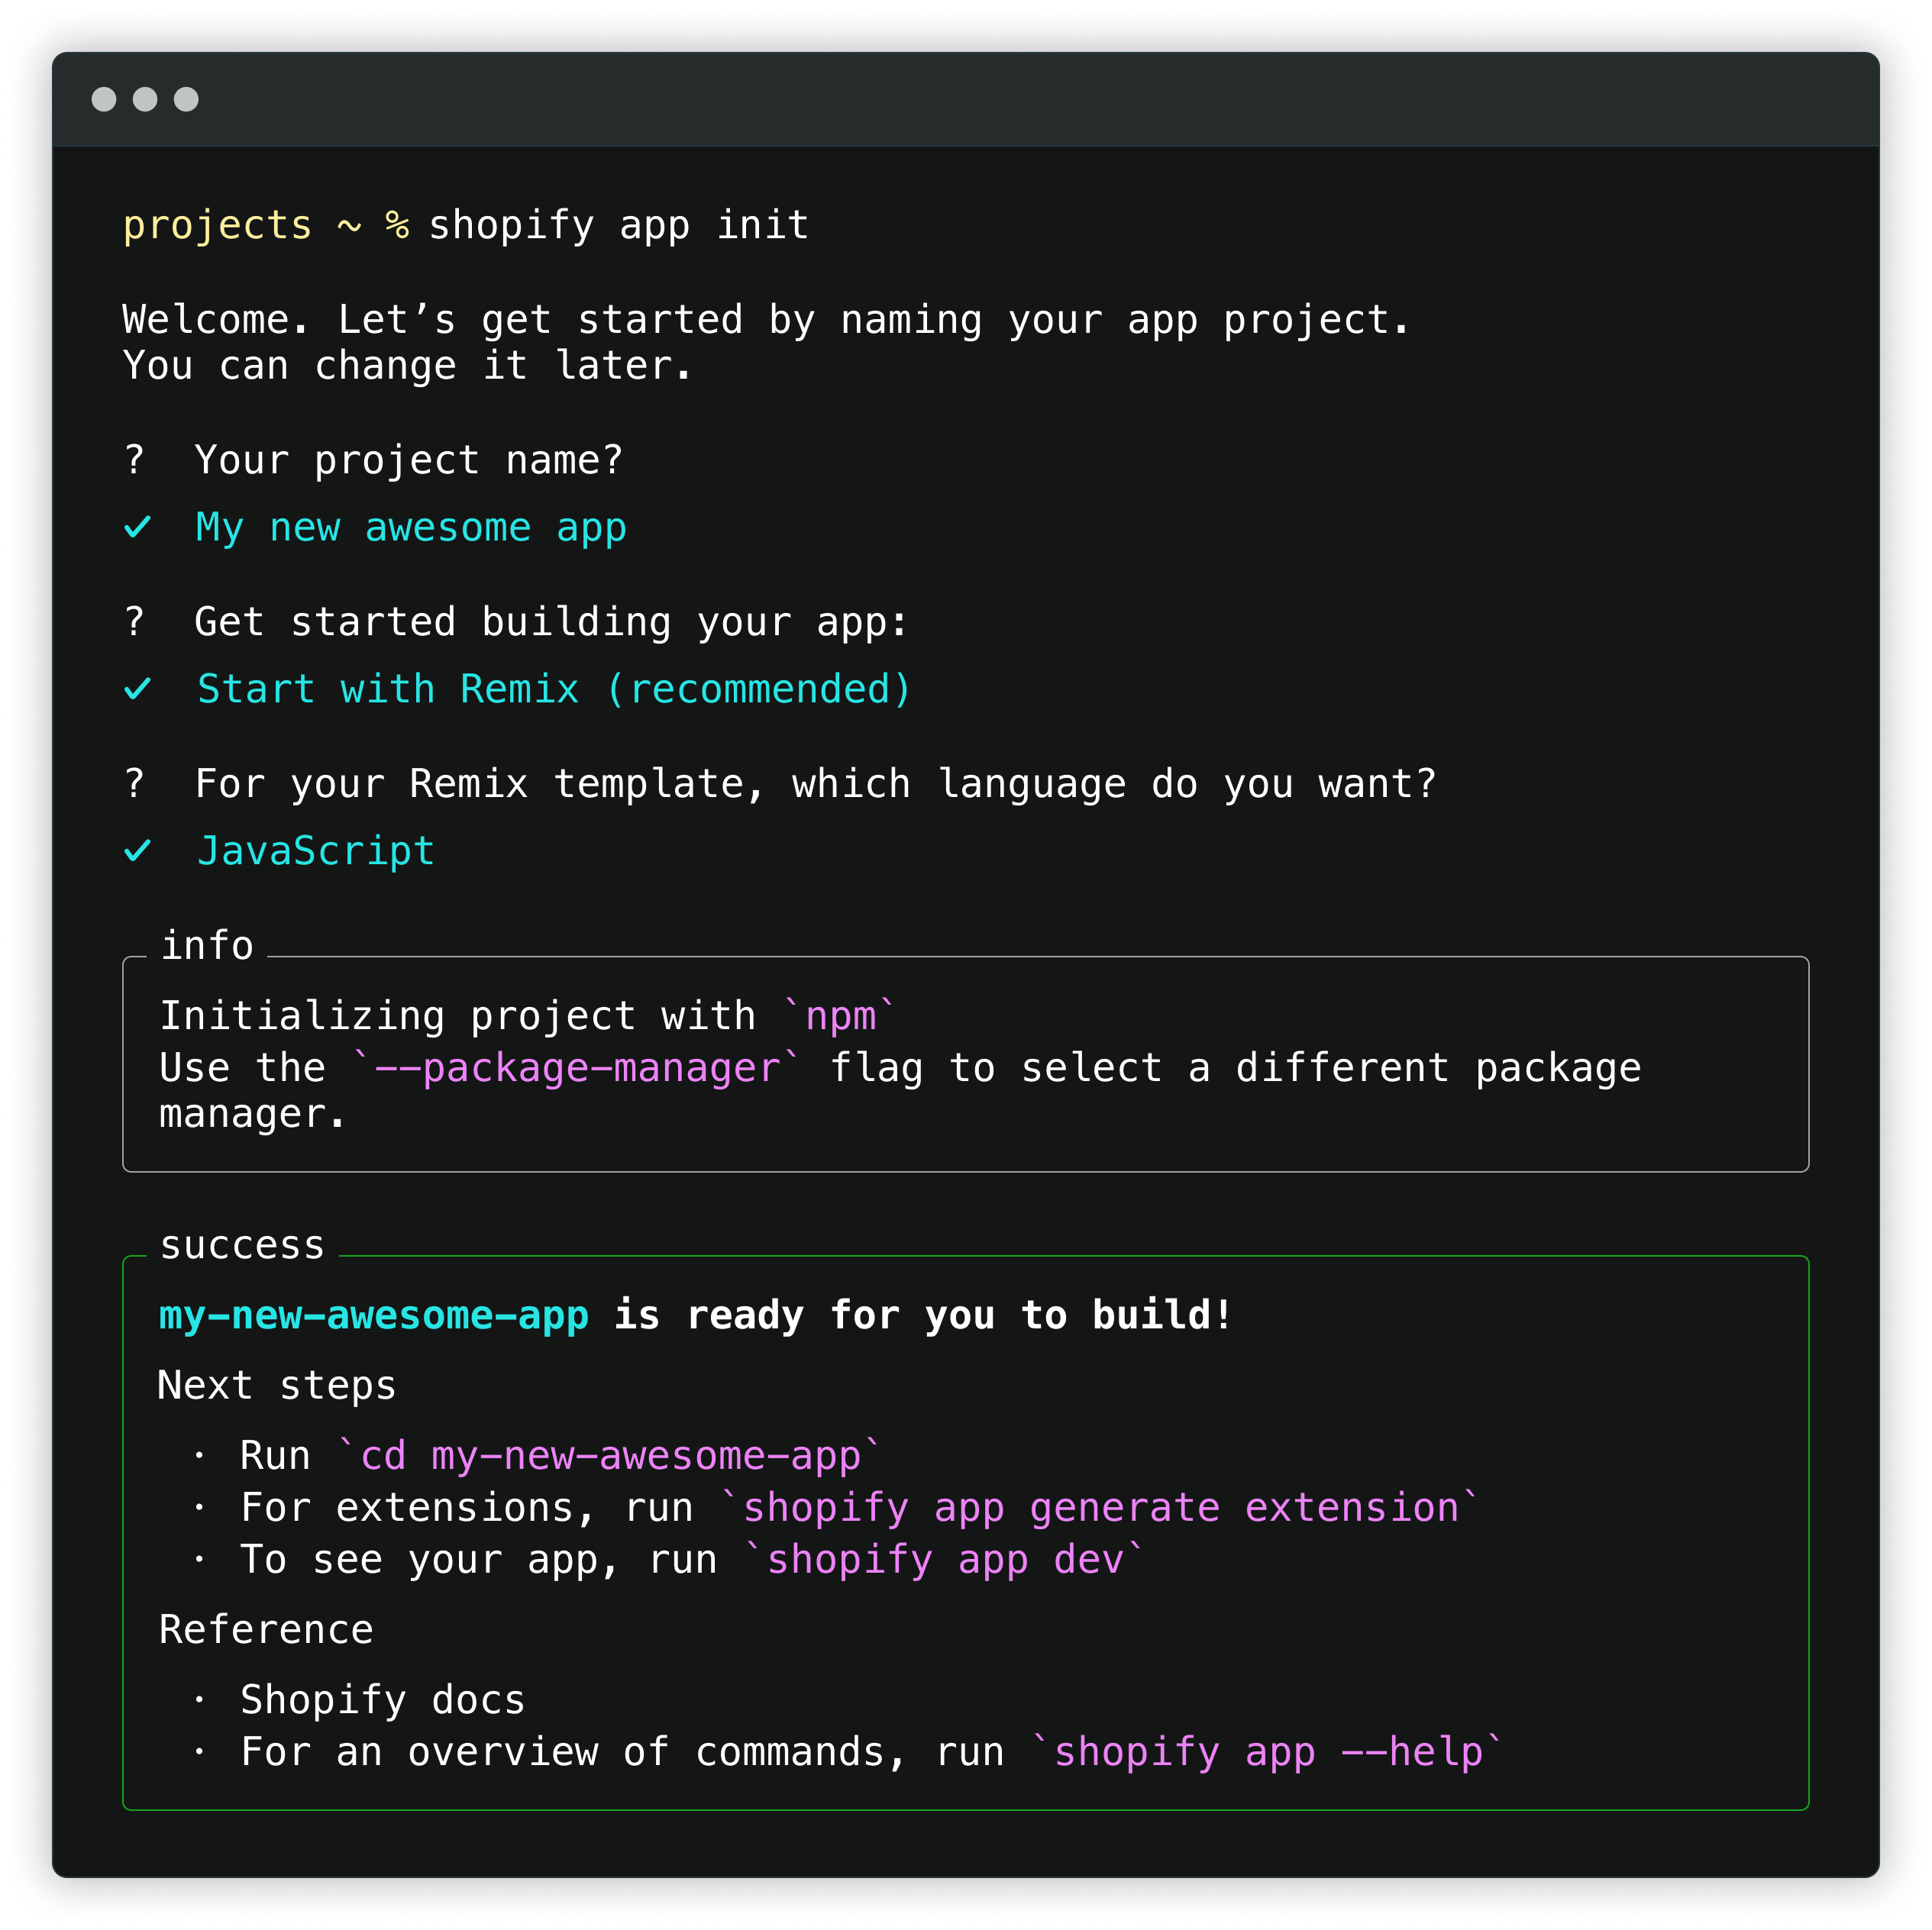
- To create a new app, run the following command: Terminal copy
$shopify app init - When prompted, enter a name for your app and select Start with Remix to use the Remix template . Tip: If you want to create an extension-only app, select Start by adding your first extension . Learn more about extension-only apps here . In most other cases, we recommend using the Remix template. However, you can use other templates or provide your own. Learn more about using other app templates here. This creates a new app and installs the Shopify CLI with all the dependencies needed to build a Shopify app.
Step 2: Start the local development server
Anchor link to section "Step 2: Start a local development server"
Once your app is created, you can work with it using a local development server and the Shopify CLI .
The Shopify CLI uses Cloudflare to create a tunnel that lets you access your app using an HTTPS URL.
- Navigate to your newly created app directory: TerminalCopy
$cd my-new-app - Run the following command to start a local server for your app: TerminalCopy
$shopify app dev
The Shopify CLI performs the following tasks:
- We'll walk you through logging in to your partner account and selecting your partner organization.
- Create an app in your Partner Dashboard and connect your local code to the app
- Create the Prisma SQLite database
- Create a tunnel between your local machine and your development store
For more information about the process that runs when you run dev , see the Shopify CLI command reference .
Step 3: Install the app in your development store
You can install apps in your development stores and automatically add products to your development stores that you can use to test the apps.
- With the server running, press to open the preview URL for your
pin your browser. When you open the URL, you'll be prompted to install the app in your development store. - To install the app in your development store, click Install app . Your development store is now running with the new app installed.
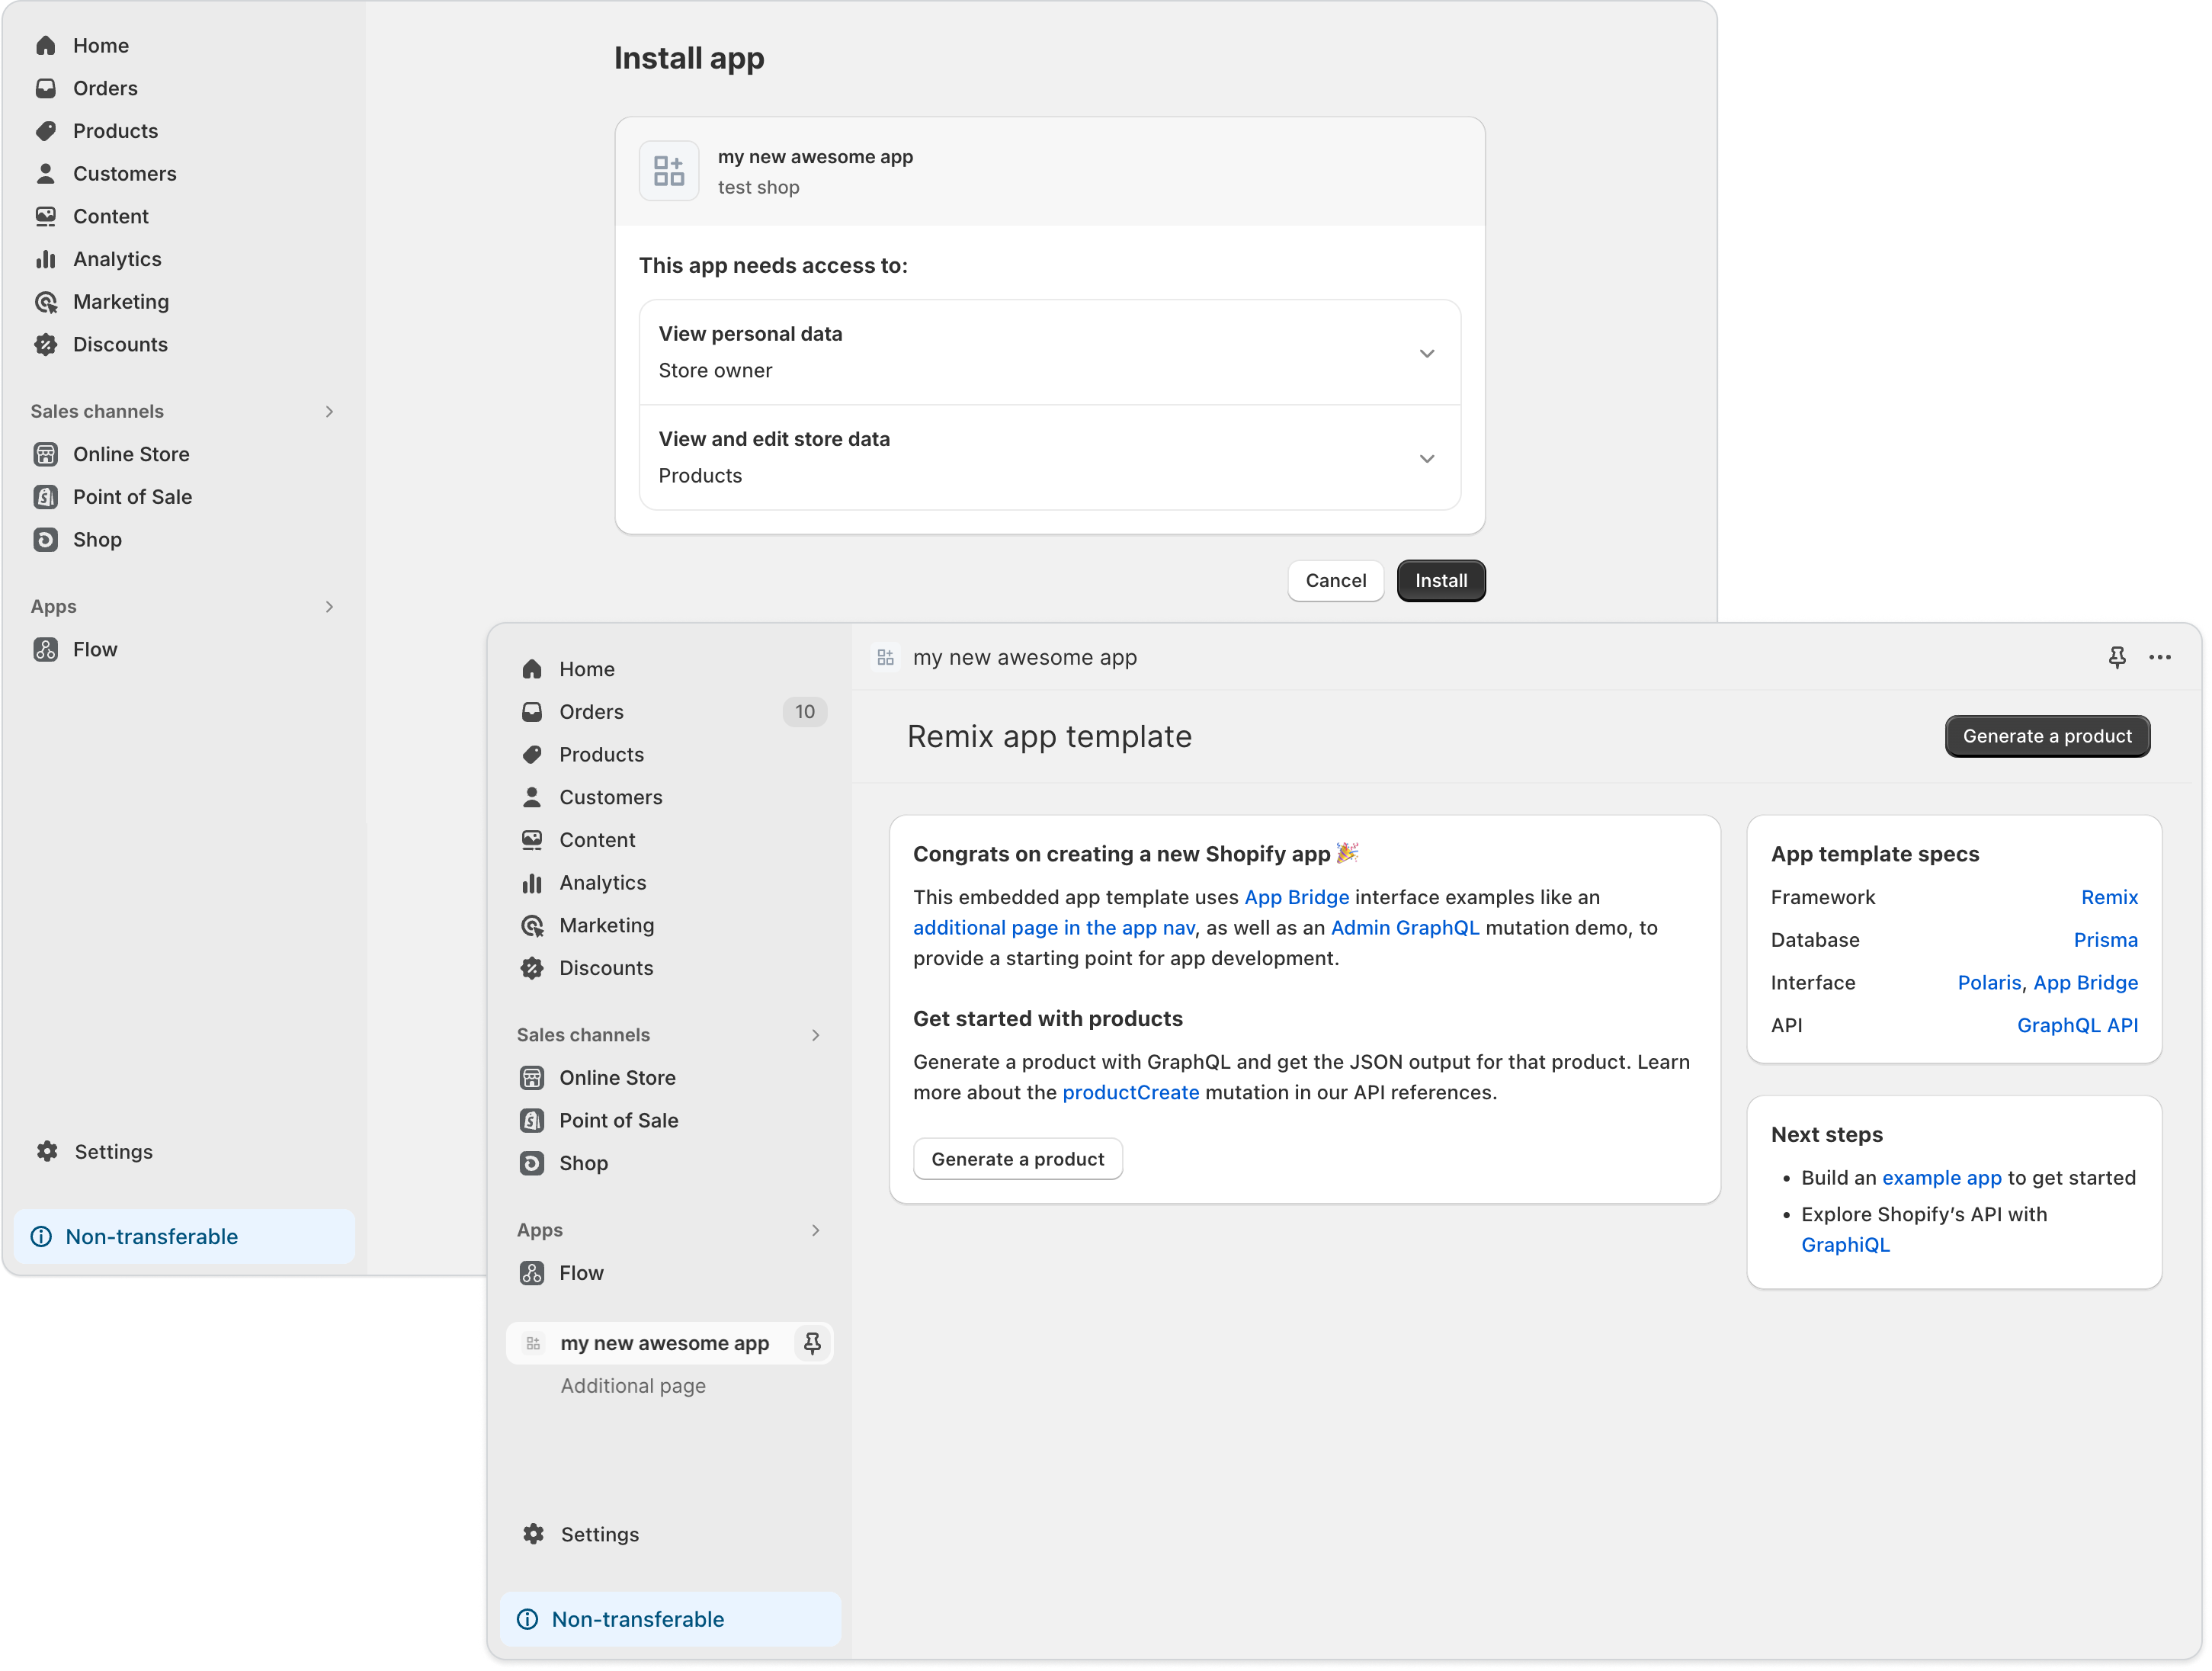
- From the home page of your new app, click Generate Products to create products for your development store.
Description of the app's main files and folders
To understand the structure of an app using Shopify's Remix template, we'll explain the roles of the main files and folders. You can find the template's source code here .
-
Project root :
-
package.json: This file manages the dependencies and scripts for your project. When you install a new package, it will be listed here. -
.env: This is the file that defines the environment variables, which contains sensitive information like API keys and secret keys. -
remix.config.js: The Remix configuration file, which manages build and deployment settings. -
tsconfig.json: TypeScript configuration file. It defines compilation options when using TypeScript.
-
-
app folder :
- entry.server.jsx : This is the entry point for server-side rendering. It is responsible for the initial rendering on the server side.
- entry.client.jsx : This is the entry point for client-side rendering. It is responsible for rendering in the browser.
- root.jsx : This is the root component for the entire application, managing the global layout and common configuration.
-
routes : The directory that stores view files. It uses file-based routing where the file name matches the endpoint.
-
auth.$.jsx: A component that manages authentication, installing apps and updating scopes. -
app._index.jsx: The component to display within the embedded app. It displays the view after authenticating as a Shopify app. -
qrcodes.jsx: This is a public component. This is the component you want to display without going through Shopify app authentication.
-
- components : Contains reusable UI components, which manage small parts that are used multiple times in your app.
- styles : Contains CSS files and styling, which manages the overall design and layout of the app.
-
Public folder :
-
favicon.ico: The favicon for your application, which sets the icon that will be displayed in the browser tab.
-
Understanding the structure of an app using Shopify's Remix template is the basis for efficient development. Understanding the roles of the main files and folders and how each one works will enable you to develop a more effective app.
Deploy the Shopify app
The Shopify CLI lets you use a local environment to run your app during development, but you can also deploy your web app to test functionality in a separate environment, or deploy your app to a production environment to prepare it for distribution.
Step 1: Set up hosting
You need to host your app before you can make it available to Shopify and your app users. For example, if you want to use App Bridge to embed your app in your Shopify admin or Shopify POS, then you need to host the app's page so that Shopify can display the app in an iframe or mobile web view.
All Shopify app templates include Dockerfile with instructions for deploying the web app in a Docker container. To simplify the deployment process, we recommend choosing a hosting provider that supports deployment with Docker.
You can use any service or platform you like to host your app, here we will use Fly.io as an example.
Setting up hosting with Fly.io
Set up app hosting with Fly.io.
- Install Fly.io and sign up with
flyctl. For detailed instructions, see the Fly.io documentation . - Navigate to the app directory: Terminal copy
$cd my-app - Run the following command to create a new app in
$flyctl launchand create afly.tomlfile:
Step 2: Get the environment variables
Apps created with the Shopify CLI use environment variables for configuration. During local development, the Shopify CLI provides environment variables directly to your environment. However, to deploy your app, you need to get these variables for your app so that you can set them in later steps .
- Navigate to the app directory: Terminal copy
$cd my-app - To get the values that need to be set as environment variables, run the following command using your preferred package manager:
$shopify app env show -
SCOPES,SHOPIFY_API_KEYandSHOPIFY_API_SECRETNote the values, because you need to set these values as environment variables for your hosted app.
After you create a hosted app, you must set and configure environment variables. You must set the environment variables you retrieved, as well as any additional variables that are specific to your app and hosting environment.
You must provide the following environment variables to all apps:
| variable | explanation |
|---|---|
PORT
|
The port to run the app on. For apps built using the Node app template EXPOSE , this variable must be set to the same value as the value Dockerfile . The default value is 8081 . |
SHOPIFY_APP_URL (or for apps other than HOST Remix) |
The fully qualified domain name (FQDN) that will be accessed when the app is deployed. Must include HTTPS. |
APP_ENV
|
The app's environment. This variable is only for PHP apps and should be set to production . |
SCOPES
|
The app's access scopes obtained using the Shopify CLI . |
SHOPIFY_API_KEY
|
The app's client ID, obtained using the Shopify CLI . |
SHOPIFY_API_SECRET
|
The client secret for your app, obtained using the Shopify CLI . This value should be stored securely. |
Set up Fly.io
Anchor link to section titled "Configure Fly.io"
Configure the Fly.io app to run your app code and communicate with Shopify.
Update your fly.toml file
- From the project root, open
fly.toml. - In the
[env]section, add your environment variables using the following format: Your configuration file should now look like this:
 ...
 [ env ]
 PORT = "8081"
 SHOPIFY_APP_URL = "https://my-app.fly.dev"
SHOPIFY_API_KEY = "<API_KEY>"
 SCOPES = "write_products"
 ...
 [ http_service ]
 ...
 internal_port = 8081
 ...
Set the secret key
$flyctl secrets set SHOPIFY_API_SECRET=<API_SECRET>
Step 4: Deploy your app
After you add the environment variables to your app, you can deploy it by following your hosting solution's deployment process, which you can also use to push updates to your app.
The next section provides an example of the deployment process for Fly.io.
Deploy to Fly.io
Deploy the app to Fly.io by running the following command:
$flyctl deploy --remote-only
Step 5: Update your URL in your Partner Dashboard
After you deploy the app, you need to update the URLs in the app settings so that you can test and use the app. You need to update the following settings to point to your hosted app:
-
App URL : The base URL of the app. This URL is
HOST/SHOPIFY_APP_URLMust match the environment variables in -
Allowed redirect URLs : The callback URL for your app. This is usually the same as your app's URL with
/auth/callbackappended.
- From your Partner Dashboard, navigate to Apps .
- Select the app that you deployed to your hosting provider.
- On the Configuration page, in the URLs section, update the App URL and Allowed redirect URLs settings.
Below is an example of a URL you can set for Fly.io:
| Hosting Provider | App URL | Allowed Redirect URLs |
|---|---|---|
| Fly.io | https://my-app.fly.dev
|
https://my-app.fly.dev/auth/callback (remix)https://my-app.fly.dev/api/auth/callback (non-remix) |
summary
Understanding the basic steps of Shopify app development is the first step to success. Through this article, we hope to help beginners get started with app development with confidence. Take advantage of Shopify's powerful features and develop your own app to take your business to the next level.
Developing a Shopify app can seem daunting at first, but with the right tools and resources, anyone can create a professional app. By following some basic steps, such as installing Node.js and Ruby, using the Shopify CLI, signing up for the Partner Program, and then building and deploying your app, you can develop your app efficiently and effectively.
In addition, by using Shopify's Remix template, you can quickly set up your development environment and proceed with the project efficiently. By understanding the roles of the main files and folders, you will be able to grasp the app structure more deeply and proceed smoothly with the development process.
Finally, by learning how to set environment variables when deploying your app and how to use a hosting service such as Fly.io, you can operate your app safely and securely. Use these knowledge and techniques to further develop your business.
I hope this article will be helpful as your first step into the world of Shopify app development. Keep trying, keep learning, and keep building great apps that bring value to many people.

Ryuji Morimoto, CEO of ForestBook Co., Ltd.
I work as a Shopify app developer and have worked on public apps such as SmartPick – AI Chatbot and RemPro: Product History Viewing App, as well as many custom apps for specific merchants.
Additionally, he is an expert in Shopify app development and runs TechGeek, an online school where you can learn Shopify app development.
